I spent about 30 seconds a day grinding coffee.
That adds up to 182.5 minutes, or 3.04 hours per year. Just sitting waiting for coffee to grind. Needless to say, this is a waste of time, because waiting for coffee to grind is loud and unedifying.
This article is about my journey to create a better way to grind coffee at home.
Here’s what my grinder setup looks like:

There’s a momentary On/Off switch on the front of it, and there’s a toggle switch (turned On) on the side of the grinder.
Design #1 — FAIL!
My initial instinct was to create a device to turn On/Off the momentary switch on the front of it. Then, I could simply use that device to control the grinder!
However, I ran into some issues. First, I’d have to use a solenoid. Solenoids are essentially devices that can “Push” like your finger pushes on a switch. Secondly, I’d need to print a device to hold the solenoid. Thirdly, I’d need to build a circuit that uses a diode among other components, because solenoids can create dangerous voltage spikes in circuitry.
Design #2:
Quickly I gave up on the prior design, when I realized I could use what is called a GPIO controlled switch while leaving power constantly in the On setting, to the grinder.
(Disclosure: Affiliate links included. I do not reccomend leaving this circuit unattended in the case of hacking or equiptment malfunction. I do not provide any warranties or representations regarding this circuit design and it may be unsafe or contain design flaws. Experimental use only, use at your own risk!)
Parts needed:
1x Dataprobe iBoot-IO-OFF-LS
1x 70 ohm or Greater Resistor
Male to Female Jumpers (2 minimum)
Female to Female Jumpers (1 minimum)
1x Tic Tac Case
1x MK-1 Dataprobe Wall Mount (Optional for wall mounting)
Rubber bands
1x Raspberry Pi Pico W with soldered headers
Tools needed:
1x Utility-Type Knife

I settled on using the iBoot-IO-OFF-LS GPIO switch. This would allow me to leave my coffee grinder constantly “On”, and turn it On when needed by applying low voltage electricity (between 3v and 12v DC). This device is normally used for rebooting computers remotely, but is well within the wattage requirements for running my coffee grinder.
So what is a GPIO controlled switch? Well essentially it’s just a way to control a high voltage circuit, like one to an appliance, using low voltage DC power. To put another way, you can use a 9V battery to switch on a wall outlet circuit. This is pretty neat, because it allows you to separate your high voltage and low voltage circuitry. When selecting GPIO switches, I wanted a higher quality one that was UL listed so any kind of malfunction is less likely to result in a fire, so I went with this brand. So far it’s never failed me and performed absolutely flawlessly in the few months I’ve used it. I have however sometimes had to reboot the Pico Pi, but I’m not sure what exactly is causing that glitch — possibly the power supply I’m using.
Microcontroller Selection
I’ve never worked with microcontrollers before, so I wanted something that was user friendly, cheap, small, included WiFi, and didn’t required soldering. The obvious choice was a Raspberry Pi Pico W with Soldered Headers. These soldered headers allow you to connect using a female circuit connector. The Pico W stands for wireless, and these boards include WiFi.

The Pi Pico comes with many GPIO output pins, so you could control many coffee grinders or GPIO switches from a single board wiring them directly. For this design, we’re only using 2 of the pins, GP13 pin and the ground pin (#18). But you can use any of the GP pins. We might as well not solder anything in case we want to redesign the circuit or repurpose the microcontroller for something else.
Pin datasheet here (PDF link):
Microcontroller Case Selection

Don’t Forget The Resistor!
There’s a resistor on the positive side of this circuit that I’m using for current limiting safety. Without it, there’s a chance you could burn out your Raspberry Pi Pico from too much current draw. Select a 70 ohm or greater resistor.
Wiring it all together:
Powering the Pi Pico.
There’s a lot of options to power the Pi Pico, but I’m simply going to use a common USB charging wall outlet. Coincidentally, the USB wire fits nicely through the tic tac case.

Don’t Forget The Resistor!
There’s a resistor on the positive side of this circuit that I’m using for current limiting safety. Without it, there’s a chance you could burn out your Raspberry Pi Pico from too much current draw. Select a 70 ohm or greater resistor.
Wiring it all together:

And lastly wall mounting:

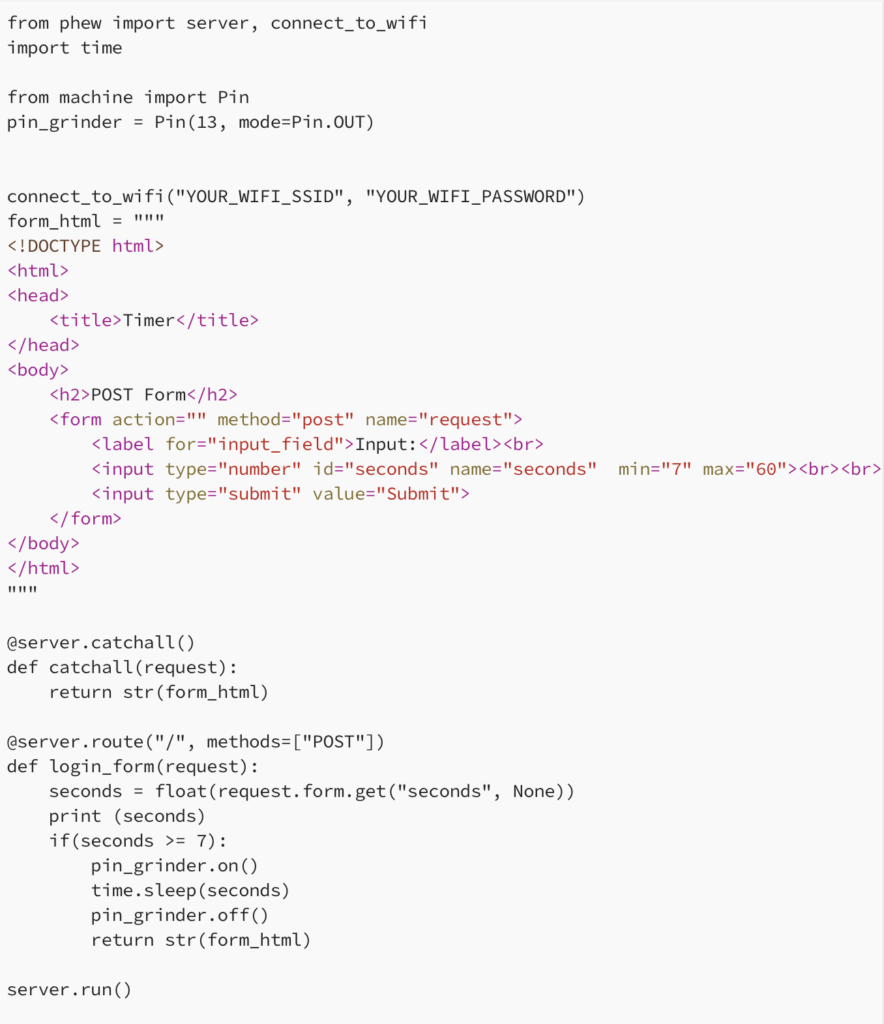
The Code:
The code in this project is pretty simple, but also might seem kind of complicated if you’ve never coded before. Don’t let that discourage you, I think a first time beginner could do this!

Use the software Thonny to install this code on your Pi Pico. Ensure you customize your Wifi SSID and input your Wifi Password. This code requires the grinder timer to run from between 7 to 60 seconds. Be sure to test it out with some other appliance (such as turning On/Off a desk lamp) before you risk grinding the wrong among of coffee!
We’re using the PHEW library to help host HTML on the Pico Pi W. This makes processing HTML Post requests easier. You need to ensure you have it loaded and downloaded through Thonny.
There’s many tutorials on how to install code on the Pi Pico W, so I won’t go into too much details but you’ll need to save it as main.py in order for the code to persist on your Pi Pico, so when you turn it on/off it will still remember.
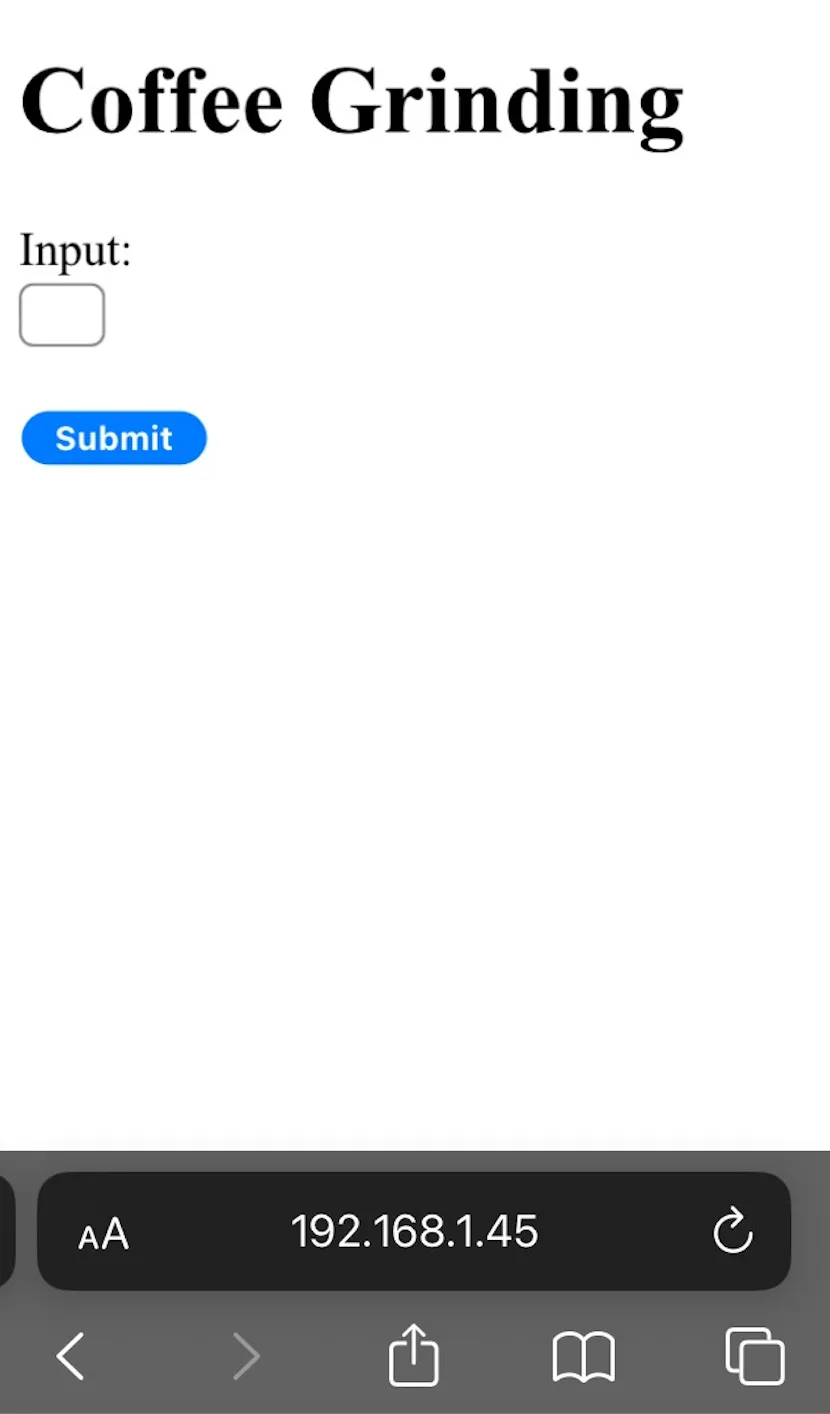
If all goes well, when you type in: 192.168.1.45/ you should see:

The IP address that your Pi Pico W is allocated to varies depending on your WiFi router.
To test the setup, type in a number between 7 and 60 and if all is well, your grinder should go on and off.
The awesome part about grinding by seconds is that there’s a very good coorelation between the amount of time you grind in terms of seconds and the final output weight of the ground coffee. I know that to make 2 cups of coffee, I grind for 15 seconds. For a whole pot, it’s about 30–35 seconds. It’s all very precise. I’ve noticed some slight variation when it comes to bean hardness, some beans do grind somewhat slower but that’s somewhat unusual and can all be adjusted for.
Now you can grind coffee from as far as your wifi can reach!
If you have suggestions to improve this project, drop a comment below! Some potential areas of improvement are making the button nicer with HTML/CSS, and making a scheduler so that coffee could be set to grind at a certain time (for example, grind 30 seconds at 8 A.M. M-F).
Leave a Reply